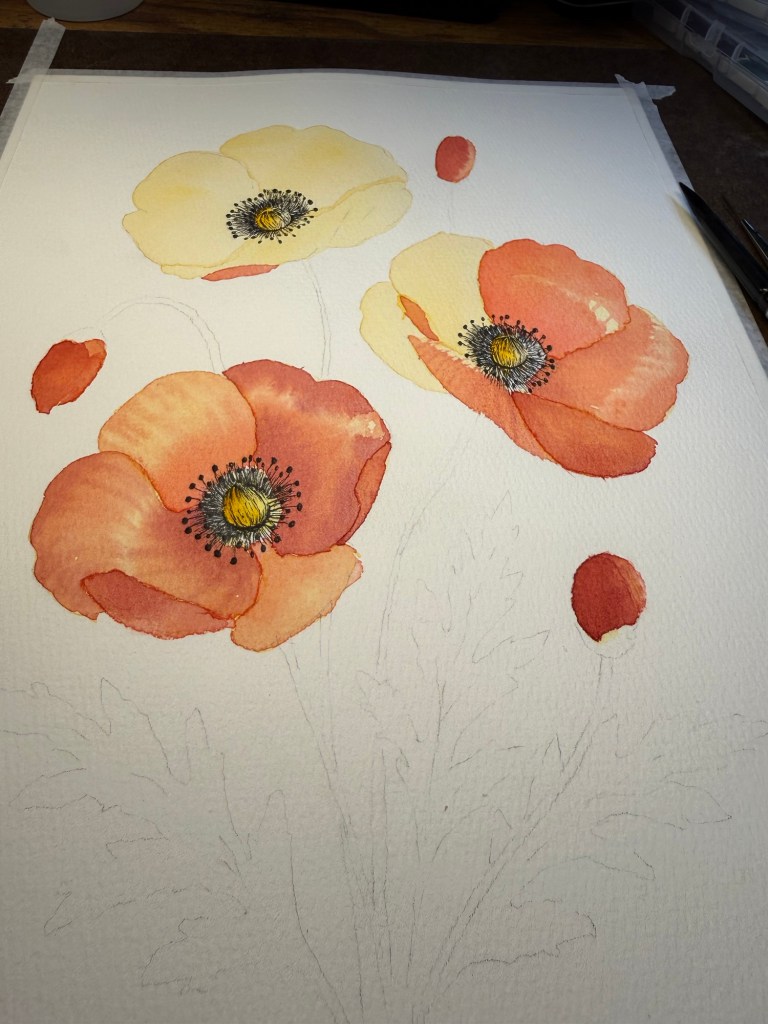
Above is the current project I’m working on. I thought it would be a good example of layering technique for beginners. None of the petals are finished yet, but hopefully you can see some of the stages of layering in this piece.
Layering is one of the best things about watercolor, especially for beginners. It slows you down in a good way and gives you far more control over your painting than trying to force all the color in at once. Instead of going in heavy immediately, you slowly build color over time with multiple transparent washes. That gradual build up creates depth, soft tonal changes, and a much more natural look in your finished work.
The biggest rule with layering is patience. Every layer needs to be completely dry before you add another one on top. Not “mostly dry.” Completely dry. If the paper is still cool to the touch, damp underneath, or has a slight sheen, wait longer. Putting a fresh wash onto damp paint will disturb the layer underneath and create blooms, muddy areas, or hard edges where you don’t want them.
When done properly, layering gives watercolor that beautiful glowing quality people are always chasing. Light passes through the transparent layers and reflects back through the paper, which creates subtle variations in tone and color that are difficult to get any other way. This works especially well for florals, leaves, landscapes, and nature subjects in general because those subjects naturally have soft shifts in color instead of one flat tone.
One mistake beginners often make is keeping every layer the exact same strength. If you do that, the painting can end up looking weak or chalky by the end. As you continue layering, gradually increase the pigment load in your mixes. Not dramatically, just enough to keep the color rich and alive. Think of the first layers as gentle stains of color and the later layers as the structure that gives the painting depth.
Transparency matters too. Not every watercolor paint is ideal for layering. Some colors are naturally opaque or semi-opaque, and they can make your work look dull much faster. Transparent watercolor paints allow the previous layers to show through instead of covering them up. If glazing and layering are techniques you enjoy, it’s worth paying attention to transparency ratings on your paints.
Paper also makes a huge difference here. Cotton cold press paper handles layering far better than cheaper cellulose paper. It stays workable longer, holds water more evenly, and allows multiple layers without breaking down the surface. Cold press also has just enough texture to help those transparent washes settle beautifully without fighting the brush the whole time.
The nice thing about layering is that it teaches restraint. You stop trying to finish a painting in one pass and start letting the painting develop slowly. That usually leads to cleaner color, better control, and paintings that feel softer and more natural overall.
Thank you so much for reading.


Leave a reply to Ionia Froment Cancel reply